Showing posts with label living room. Show all posts

Tuesday, March 22, 2016

The Resurrection of a Cart


Granny Grant had this little cart for years.

It was originally chrome and 70's green, but then she spray painted it the color you see below when she wanted an update (Oh Granny, we are alike in so many ways...).
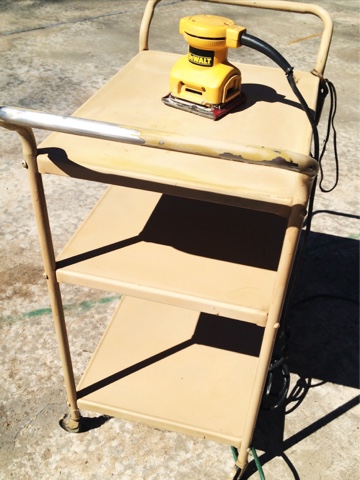


We were cleaning out her house when she moved and would you believe this was headed for the trash!?  Obviously not everyone has cart-love like I do.

My husband said "no way" but we all know there are times to be stubborn.  This was one of those times.


I used my electric sander on each piece until it felt smooth.  I wasn't trying to remove all the paint, I just wanted it to feel smooth so that the chipped paint wouldn't show.

I could have spray painted it without taking it apart but I don't like how pieces look when they've been sprayed and creases are painted and eventually crack.


These screws were caked with paint so I used my sander on each one to remove the paint.  Putting them in a piece of cardboard makes spraying them quick and easy.

I asked my friends what color they thought I used.  Don't you love their ideas and guesses?! 
Funny that no one said gold...


For smaller projects I like rub-n-buff or gold leaf (you can see a scrap of gold leaf from another project on the counter in this picture).


The first round of spray paint resulted in a color that was more bronze than I wanted so I did a second coat with this paint.  I really like the color.

Here's a close up.


I'm still not sure what I should put on it--y'all have any ideas? I looked online and mostly saw pictures of carts used as wet bars. 


I love the thought of having a cart in the kitchen or using it when people are over for snacks and drinks, but for now I've nestled it here.  


Thursday, January 29, 2015

design boards are my new bff


I'm teaming up with the fun people at Chairish today to create a design board inspired by one of their amazing rugs

 In answering their question of how I like to infuse color into a space, I would say the easiest way is to use something colorful that you love as your inspiration--a rug, a pillow, a dish towel, anything really.   
Don't just pick one color you like or you'll constantly be asking, "does this go?" and annoy the heck out of your friends (not that I've ever done that, of course!).  
If you pick a piece that already has great color combinations then you already know it works well together.  

This rug was said inspiration.  If you look closely, you'll see red, gold, cream, blue, purple, black--it's easier to design a room when you already have great colors like these.

   Surely you've heard of Chairish, right? It is an oh so cool website where design lovers buy and sell their fabulous finds.  Whether you're wanting to sell, buy or just be inspired by their creativity, you won't be disappointed.


Here are the sources for all of these great pieces:

The rug was the original inspiration from Chairish and can be found here.  They have a lot of great rugs.


This couch--the color, the fabric, the shape, I love it so...
You can find it at One Kings Lane.


I would paint the room white and install this lovely wallpaper from Houzz on one wall.


You can find this side table here; it's also from Chairish.


I love this table but in real life I would need to have rounded edges.  Glass corners and rowdy boys do not mix well.


All pillows are from Sukan Handmade Design, also on Etsy.


You won't believe this light--it is a DIY at One Kings Lane.  
They give detailed instructions on their site.  So cool.


Gerhard Richter (I can dream, can't I?!)


A friend of mine, Raina Hampton painted this piece.  Such talent!


Swing Chair is from Urban outfitters--because we wouldn't want our room to take itself too seriously.


This sunburst mirror is also a Chairish find. 


And of course this piece can be found here.


This has been such a fun project.  Have you ever created a design board?  I'd love to know your favorite finds or tips.


Tuesday, April 9, 2013

today's post is brought to you by the letter h


I've been looking for a wooden letter to add to our kid's art wall for some time now.  My favorite was the sleek, modern, wooden W that I saw outside of the women's bathroom at our local mall, but no luck in finding out where they got it.  Ever ask a bathroom attendant if they know where the "W" came from? Yeah, well I don't suggest it.

So after I had some leftover moss the other day from crafting some wreaths with a friend,

isn't her finished wreath great?!

I decided who needs super cool, modern wooden letters anyway?  Not me.  I'll just make my own letter thankyouverymuch. 


The "super moss" and the letter came from Hobby Lobby.  I think the moss was $7 and the letter was $3.  It comes in one big sheet so you can use it for multiple projects.


The first thing you'll want to do is lay your letter on the back of the moss, trace around it, and cut it out.  I don't have a photo of this because I forgot to take one.
    

 I used mod podge to adhere the moss but you could use a hot glue gun or even Elmer's.


 Press the moss onto the letter...


Lay your letter, moss side down, and put something on top of it for a few minutes.


Now that might be one of the quickest (10 minutes) and cheapest ($10) crafts I've done in a while...well except for my kitchen curtains.


It's just leaning up there right now so I can keep my options open if I need to move it.