Showing posts with label uncommon uses. Show all posts

Tuesday, April 19, 2016

the painted pillow


When I ordered this pillow cover from h&m I didn't know what I'd do with it, but knew that the possibilities were worth $4.99.  By the way, who knew that h&m had such great bedding!?  My mom got the boys linen duvet covers and shams for Christmas from there, and we love them.


 I honestly don't have any photos of the painting process because I really didn't think I would like it, and especially wouldn't post about it. 

But one day as I was painting the canvas you see the corner of this photo, I decided to experiment with painting on the pillow cover.  
I placed a piece of cardboard inside the cover (there's a zipper in the back) so it wouldn't bleed through.  I used both fabric paint and acrylic paint.  
After it dried, I removed the cardboard and put the pillow form in the cover. 


I love the way it turned out!
I should probably make a disclaimer that this is not the pillow you'll snuggle up with--it is not soft.  It's just a simple way to add color to a room.  
Wouldn't this be a fun project to do with your daughter for her room?


You can barely tell in the photos, but the gold that I used was metallic so in person it catches light--so fun!


I found the turquoise chair at a flea market in Shreveport.  I didn't even have to paint it!  The frame on the wall is from the trash, and the branch is one that was on our porch one day that I decided to hot glue it to my wall.  Don't worry, it comes off easily.

One more thing--do y'all have the Color Snap App from Sherwin Williams?  You can take any photo and match the colors to make a color pallette.  So if you have trouble putting colors together for projects like this or for decorating a room, you could use a picture to get started. 

Here are a few photos that inspired me to make a color snap pallette. Once it matches all the colors, you can click on any of the small squares at the bottom to see the name and number of the color.  


Monday, April 11, 2016

the never ending t-shirt


Last week I told you how I often use shirts and sheets, or any fabric I can get my hands on, to make pillows.

I didn't start this because of clever creativity but more out of necessity and limitations.


I wrote a few years ago about one way I repurpose outgrown t-shirts.

Of course there are a lot of t-shirts that come and go with little emotional affect, but then there are those that bring a flood of memories.

You see that Detroit Dogs shirt above?  This was the shirt my middle son wore when he was five.  For what seemed like the whole year. With orange basketball shorts that were too big (anyone else have sons who liked shorts so big they looked like a skirt? or kolots?).  The grey shirt with the red football on it was a toddler shirt.  All three of my boys wore it--I get teary eyed thinking about my little chubby boys in that shirt and a diaper. Anyway, so you get my point.

Today I want to show you how easy it is to make pillows from a t-shirt.


This shirt is not as much of a memory  for me, but it is for my youngest.  He is 9 and into all things sports.  And yes our team is called the Wampus Cats--a six legged cat--4 to run the speed of light and 2 to fight with all its might.  

He was so sad when we declared this shirt outgrown so I quickly pulled out the machine and got to work.  I may have a throw pillow accumulation problem which my kids do not share, but they'll agree to having extra ("they aren't extra, they are necessary!") pillows if they're cool.

Keep in mind that the definition of cool changes often and suddenly--rule number 523 of parenting.

The tricky part of t-shirt pillows is getting the logo centered if the shirt isn't very large.  I didn't do a great job with this one but no worries.


As I've said in other posts, I always draw straight lines to help.


I wait and cut the excess after it's sewn in case I make a mistake.


And don't forget to use a pillow form that's a little bigger than your pillow so it will be nice and full.


The pillow sham on his bed (which looks empty in this pic) is one I made years ago out of my husband's old dress shirts and pajama pants (!), which is fitting because it's for the son who would permanently attach himself to his dad if he could...

Tuesday, June 2, 2015

marbelized art


The DIY I'm sharing with you today is easy, inexpensive, and colorful.  I'm always looking for colorful art for my walls. 


I loved Oh happy day's tutorial on how to marbleize ribbon (isn't that the coolest!) so I thought I would try it on a few small canvases I had.  If it turned out, great, and if not I would just paint over them.  This is the attitude I have to have with all diys because goodness knows I've had lots of fails.


What you need:
shallow pan that you won't mind tossing when you're done
3-5 colors of fingernail polish--get the cheap kind
skewer or tongs, I used popsicle sticks because I bought a package in 1988 and still have so many
canvas or whatever you are wanting to marbleize
cover your surface because this can be messy
Since this is way smellier than you would think, open windows or do this outside.


Fill pan with a few inches of water

You'll want to do the next few steps super fast because the fingernail polish dries quickly when it's in the water--this is why there are no photos of dipping the canvases in the water.


Open the polishes and pour them into water, use skewer to drag paint around a little.

Dip the surface of your canvas in the water.  It really just needs to touch the surface, don't plunge it deep. The canvas will grabbed the paint instantly. 

Raise it up but leave it facedown for a few seconds to allow it to drip.  Turn your canvas over (do this move quickly so the paint stays in its original place) and put on covered surface to dry. 

I also did the same thing for the edges, but you could leave them white if you want.


It's always nice to have the help of a buddy when you're doing a project!


After we finished all of them , we put them in the garage to dry overnight because we didn't want them to dry outside but also didn't want our entire family to get loopy from the fumes.  Using a flattened box as a drop cloth makes carrying them easy.


I hung my favorite three together on a narrow wall space.  You could use larger canvases but you'd need to have a large enough container for the water and polish that you wouldn't mind throwing away when you're finished.  

Thursday, April 23, 2015

duct duck goose

If you follow me on instagram, you've seen my duct tape wall...or is it duck tape?   


I had seen a room with tape for stripes, so when I saw GOLD TAPE at Kroger (what!?), I had to grab it!


Our entry needed a little something so why not, I thought? 
 
It was a day that I had people coming over in a few hours and I should have been cleaning or cooking or cramming piles of clutter in drawers, but when inspiration strikes...


The only reason I did such random lines was so I didn't have to measure or get anything exact.  Rulers (and timers) are not by bff. 

I used scissors to cut the edges which is why they are a bit wonky.  A sharp exacto knife probably would have worked better, but oh well.


Here's the funny part, there are two very different responses to this wall.  Some get it and have even tried something similar in their own homes.  But when others see it, the conversation goes something like this--

them:  oh, are you going to paint over that tape?
me: nope, just leaving it like it is.
them: oh-ohkaay.

I guess we have to be ok with people not getting it.
True creativity is birthed when we can get beyond wanting everyone to understand our design or art or clothing. 

How not fun would it be if everyone got everything about us!? 
Trying to "fit in" to the design world, or any "world" really (remember middle school?),
makes us paralyzed and unable to make a decision--trust me, I've been there. 
 
Eventually you either have to make decisions and learn your own likes and dislikes, you never do anything, or you play it really safe and your home ends up feeling very generic--I've been there too.


Hello dead wreath.
 
  
What are some of your design ideas that not everyone understood?
 
And in case you completely zoned out trying to figure out if it's duct or duck tape, go here.


Wednesday, January 28, 2015

the making of a light...and a nook...and a boy...


Since our oldest has a large closet, way larger than he needs, we decided to make a desk nook on one side of it.  The most fun part was making the light for only a few dollars.  We've done this many times before, and so far it never gets old.  


All you need is a pendant light kit, like this one from Hobby Lobby (make sure to use your 40% off coupon), some sort of basket--I used a wire one here (also from the hobs for half off), and maybe a zip tie.  


 Thread the pendant wire through the basket.  It's best to do this without the light bulb, but I was impatient so I risked shattering glass everywhere.  


Attach the pendant to the basket.  I used a zip tie on this light but the type of basket will determine what you use, if anything.


 Now you're ready to attach your light.  You can use a small hook or staple gun (just don't puncture the wire).  I used both on this project, the hook to hang the light and staples to keep the wire in place.


Here's another cool idea for hanging these lights.


 For the rest of this project, I used black chalkboard paint that I had on hand for the wall.  We had the two wooden planks from another project so we painted them and attached them to the wall.  The chair is from Wal-Mart years ago.  (You'll remember this post where I sang the praises of these chairs--and we still love them.  Unfortunately they are no longer $15, but I would gladly pay more because they have all lasted and OH MY GOSH WE ARE SO ROUGH ON EVERYTHING!) And the poster came from The Rusted Arrow.  I didn't want to do a lot to this space because the idea is to not be distracted and SIT AND STUDY.  But we'll see about that.  Where do you and your family like to read and study?  


Monday, October 27, 2014

Simple door storage aka a boy's room essential


Happy Monday friends!  After living in 3 different houses with three boys through the baby/toddler/little kid/big kid/teenager stages, with all kinds of room arrangements, I've noticed that there are a few things that are essential to a boy's room.  

 One the simplest ones that has made the biggest difference is 
a place for all their little "treasures." 
You know those treasures, the ones that don't need to go in a keepsake album but also don't need to be thrown away...keys, locks, nerf bullets, matchbox cars, army figures.  When they were little and I helped them clean their room I would say, "put it in it's home," which meant that it was up to me to find a home for everything.   

This was especially useful when we lived in houses with no storage.  We've used these shoe organizers in multiple rooms--including the pantry and laundry room.   If you came to my house right now, you would find 5 of these.  They are quick and easy to install--the only reason this is a diy is that I use ribbons and tacks instead of the metal hangers that come with it because they scratch the doors.


Make sure to get one with the clear plastic so you can see what's in the pockets.  You can find these at any Wal-Mart or Target.

Here is where the diy part comes in.  


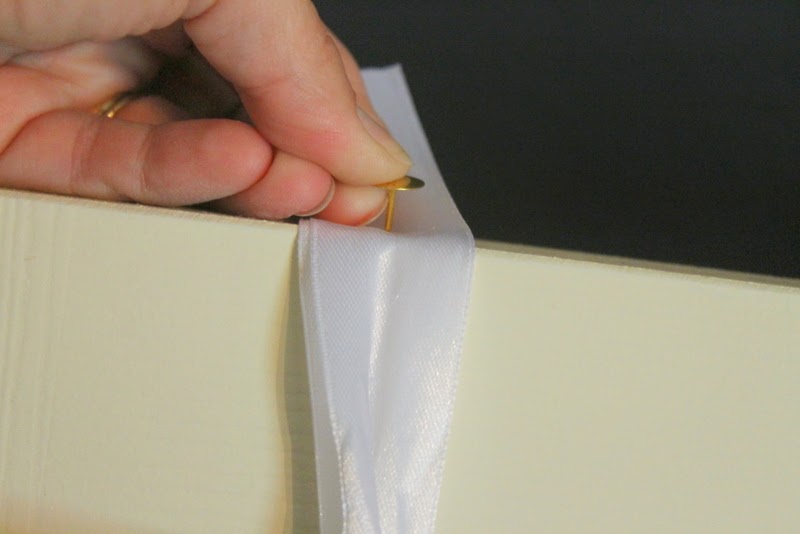
 Measure and cut strips of ribbon, all the same length.


Use flat tacks on the top of the door to attach the ribbons. 


Hammer them in once your fingers give out.


Cut off the excess ribbon so they won't be visible when the door is shut.


I put this one up when they were at school, but trust me, by 3:30pm it will be full of little crap treasures.

 Here's one from my oldest's closet door.


Yes, that's a molding of his teeth from when he got braces.  Sentimental, that boy.